


Spam Shield for WordPress
A real-time comment & contact-form spam blocker for WordPress websites.


100% No-Risk, Money Back Guarantee!
Over the next 14 days, if our plugins aren't right for you, we’ll refund 100% of your money. No questions asked!
About Spam Shield for WordPress
Spam Shield for WordPress is an easy way to block contact form spam and comment-spam.
Works with:
- Beaver Builder
- Contact Form 7
- Elementor
- Fluent Forms
- Gravity Forms
- Kadence Blocks
- NInja Forms
- WP Forms (free and pro)
- WordPress comments
The Spam Shield database is always growing and adapting to new forms of nuisance spam, and you can use the back-end REST API in your own projects, too.
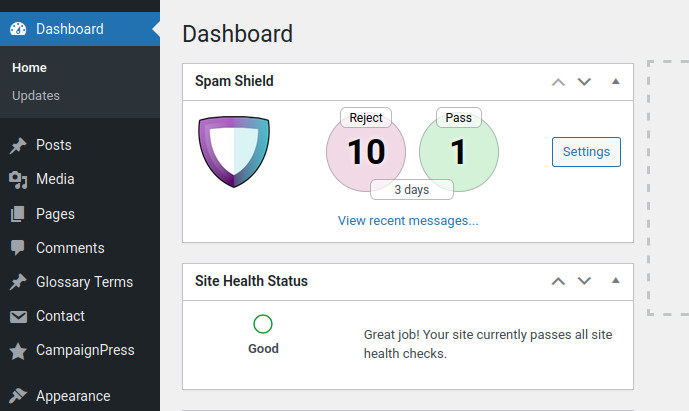
Get rid of reCaptcha
The thing about adding a reCaptcha to your contact forms is that you never know if it’s actually blocking legitimate messages by mistake. With Spam Shield, you can see the last few days worth of messages that have been blocked so you can keep an eye on things… safe in the knowledge that you’re not missing out potential customers.
- Free for small sites
- Affordable for bigger sites & hosting providers
- White-label for agencies
Changelog: Spam Shield
Version 2.6.0
Released: 2024-03-17
- We now check for the isHeavySpammer field in the API response. This lets us protect against some heavy-spammer IP addresses without making multiple calls to the Spam Shield API.
- Minor adjustment to the IP flood protection, as part of the heavy-spammer block.
Version 2.5.0
Released: 2024-03-01
- Added a new option to block messages (as spam) if they contain lots of non-Latin characters. Future updates will include more granular control, so you can block/allow Cyrillic, Japanese, Latin and other character sets relevant to your site's language/country.
Version 2.4.0
Released: 2024-01-16
- Added an integration for Ninja Forms
Older releases
- Fully switched over to the new API v2
- Minor update in preparation for shutting-down the old V1 of the API server.
- Added Gravity Forms integration
- Added options to the message-viewer so you can add countries to your allow/block list with one click
- Fixed the "Change this to spam" link in the message viewer so it works with API Version Two
- More progress with switching from API Version One to the new Power Plugins hosted API Version Two
- Added en-GB and de-DE (machine translated) language support
- Experimental support for version 2 of the API is included. Do not enable this unless you have a Version 2.0 API Key. The recommendation is to stay with Version One until the new API has finished acceptance-testing.
- Updated the code base to fix minor warnings about PHP 8.2 compatibility.
New integration for Fluent Forms.
- Minor fix to avoid a PHP warning when running the plugin for the first time on a new site.
- An update to the HTML form delay activate code to outfox a few more of the bots.
- Added the new delay-activate function for on-page HTML forms. WooCommerce basket and checkout forms are excluded from delay-activation. This new function is enabled by default, but you can disable it on the settings page.
Improved the message field checker to block more spam contact requests at source, without using API calls, if possible.
Adjusted the logic a bit so that messages are saved BEFORE they're checked and classified. This is so that if there's a problem/break in the communication with the spam shield server, the message is still saved in your admin dashboard for review. It reduces the risk of losing out on legitimate enquiries.
- Fixed a warning in the logs with the spam_shield_can_view_admin_widget filter.
Added a filter called "spam_shield_can_view_admin_widget" allow more access to admin/editor/manager user-roles to view the admin widget (and view messages) in Spam Shield.
Minor update to refresh the power-plugins core support library.
New: Built-in integration for Beaver Builder Pro and Ultimate Addons for Beaver Builder (contact form)
New feature to reclassify messages from the admin widget. Reclassified messages are sent back to Spam Shield for potential use in training the algorithms. Only the message body is used in algo-training - message fields are not sent back to Spam Shield in case they contain personally identifiable data.
Minor update for better detection of the server's IP address, with the "Check server\\s reputation" function in the settings page.
Added a new quick look-up in the General Settings page, to check the site's reputation in the Spam Shield database. Useful when diagnosing API connection problems.
- Applied the better CDN client IP detection to WP Comment form spam detection too.
- Updated the function that detects the client's IP address for better repeat-spammer detection behind a CDN.
Added the ability to exclude fields from spam checking when using Contact Form 7.
Minor improvement to when Spam Shield passes classification hints to the API server.
Added IP address flood protection.
Added integration support for the contact form that comes with the Kadence Blocks plugin.
Minor fix to protect against malformed/dodgy message fields data.
Slightly enhanced the "Check Connection" function on the settings page. If the plugin can't get your account information from api.spamshield.cloud then it tries to connect to the server via a socket, to see if there is a firewall block in there for some reason. If your site is sharing an IP address with lots of other sites, there's a chance that the IP address is tainted becase one of those sites has been hacked and is part of a spam-bot network.
Minor update to support newer versions WPForms Pro, tested with 1.7.5.5+
- Added support for Elementor forms.
- Refactored the integrations so they're more (properly) modular.
Added a switch to turn-off admin dashboard nags about CF7/WPForms integrations being disabled. Some clients want to disable Spam Shield for their CF7 forms, but leave it enabled for comment-spam.
Tidier auto-configuration on first-run to support auto-installs from wp-cli.
Bug Fix: In WPForms Pro, spammy contact requests were being detected, but still being emailed through to the notification recipients (WPForms Lite was OK). Corrected to work with both version of WPForms.
Minor improvement to the message previewer.
Fixed a but when sending through WPForms.
Admin dashboard message viewer
- filter spam/ham messages
- tidier UI on mobile devices
Adjusted the message-viewer to strip HTML tags from spammed messages in preview
Fixed minor cosmetic issue when viewing messages from the admin widget popup.
Improved comparability with PHP7.x
Minor update to better-handle saved messages if they've somehow got mangled.
Minor update with a tweak to the Power Plugins core libs.
More support for agency white-labelling.
Minor adjustment for better support of API-to-hostname restrictions when in Agency mode.
Initial public release
Minor update to use accurate flags graphics from https://hampusborgos.github.io/country-flags/ against country geo-located message sources.
Added fault tolerance around mangled/missing dates coming back from the stored messages.
Added integrations for WP Comments and Multi-Contact Bubble
Fixed a bug with APi key retrieval in stand-alone mode.
- More agency-mode support
- Added country code 2 (flags) to the "view recent messages" modal
Added better first-use auto-configuration
Added "agency mode" and "local/private mode"
- Fix the "Check licence" button on the settings page
- Fixed false alarm about a missing Power Plugins licence key (Spam Shield doesn't need a Power Plugins licence key)
Updated some core Power Plugins assets.
- Added the Recent Messages viewer and the main admin dashboard widget.
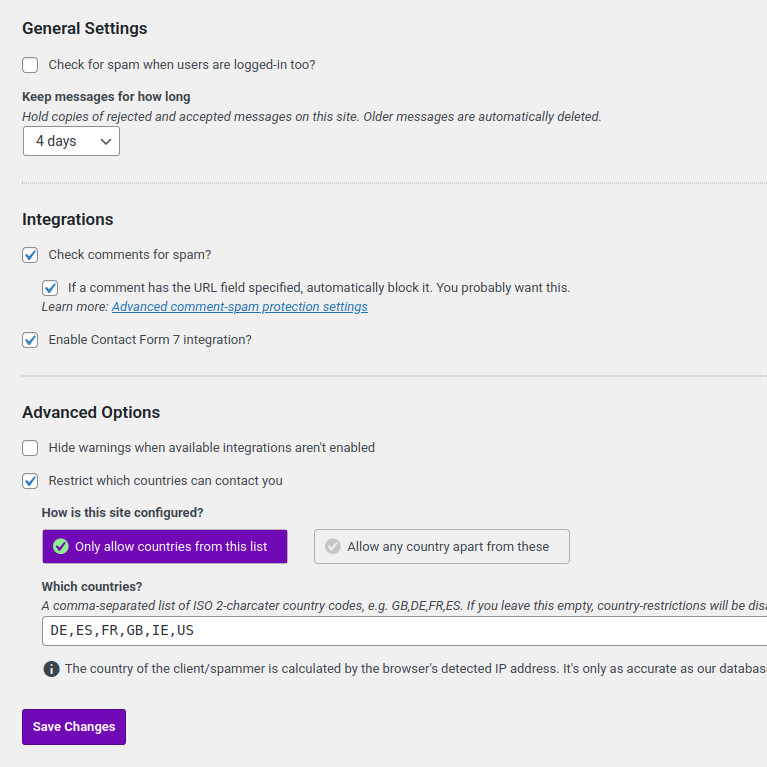
- Added the Settings page, so you can have country allow/block lists.
- Added WPForms integration
Initial development release


Bill –
We’ve installed Spam Shield on all our new websites and it’s massively helped with the amount of spam we receive. It’s very easy to install and get up and running.
Clare –
We have been running Spam Shield on our website for a few months now. It is good to be able to see the messages that have been rejected on the dashboard of our site – it gives me peace of mind that no genuine messages are being held up. It has reduced the amount of spam emails that get through to our email account and that reduces my workload.
Paul –
We’ve been running Spam Shield on all our clients’ WordPress sites (at Headwall Hosting) since June 2022 and it’s been great. Clients especially like seeing recently rejected contact requests in their dashboard (like a Junk folder). It gives them peace of mind they’re not missing out on legitimate enquiries.
Note: Spam Shield was developed in partnership with Power Plugins and Headwall Hosting, so this might be a bit biased 🙂